Arhipelagul cascadelor: Diferență între versiuni
| Linia 106: | Linia 106: | ||
! style="text-align: center;" Colspan="3" | {{sized-external-image|25px|https://foero.innogamescdn.com/assets/guild_battlegrounds/hud/guild_battlegrounds_league_diamond.png}} Diamond | ! style="text-align: center;" Colspan="3" | {{sized-external-image|25px|https://foero.innogamescdn.com/assets/guild_battlegrounds/hud/guild_battlegrounds_league_diamond.png}} Diamond | ||
|- | |- | ||
! style="text-align: center;" | {{sized-external-image|25px|https://foero.innogamescdn.com/assets/shared/icons/icon_fragment.png}} | ! style="text-align: center;" | {{sized-external-image|25px|https://foero.innogamescdn.com/assets/shared/icons/icon_fragment.png}} Fragmente de Me | ||
! style="text-align: center;" | {{sized-external-image|25px|https://foero.innogamescdn.com/assets/shared/icons/icon_fragment.png}} | ! style="text-align: center;" | {{sized-external-image|25px|https://foero.innogamescdn.com/assets/shared/icons/icon_fragment.png}} Fragmente de Gi | ||
! style="text-align: center;" | {{sized-external-image|25px|https://foero.innogamescdn.com/assets/shared/icons/clan_power.png}} Putere | ! style="text-align: center;" | {{sized-external-image|25px|https://foero.innogamescdn.com/assets/shared/icons/clan_power.png}} Putere | ||
|- | |- | ||
| Linia 116: | Linia 116: | ||
| style="text-align: right;" | 52 | | style="text-align: right;" | 52 | ||
| style="text-align: right;" | 48 | | style="text-align: right;" | 48 | ||
| style="text-align: right;" | | | style="text-align: right;" | 218.400 | ||
| style="text-align: right;" | 78 | | style="text-align: right;" | 78 | ||
| style="text-align: right;" | 72 | | style="text-align: right;" | 72 | ||
| style="text-align: right;" | | | style="text-align: right;" | 327.600 | ||
|- | |- | ||
| style="text-align: left;" | 2 {{sized-external-image|25px|https://foero.innogamescdn.com/assets/shared/icons/reward_icons/reward_icon_guild_battlegrounds_chest_2.png}} | | style="text-align: left;" | 2 {{sized-external-image|25px|https://foero.innogamescdn.com/assets/shared/icons/reward_icons/reward_icon_guild_battlegrounds_chest_2.png}} | ||
| style="text-align: right;" | 46 | | style="text-align: right;" | 46 | ||
| style="text-align: right;" | 40 | | style="text-align: right;" | 40 | ||
| style="text-align: right;" | | | style="text-align: right;" | 191.300 | ||
| style="text-align: right;" | 62 | | style="text-align: right;" | 62 | ||
| style="text-align: right;" | 52 | | style="text-align: right;" | 52 | ||
| style="text-align: right;" | | | style="text-align: right;" | 287.000 | ||
|- | |- | ||
| style="text-align: left;" | 3 {{sized-external-image|25px|https://foero.innogamescdn.com/assets/shared/icons/reward_icons/reward_icon_guild_battlegrounds_chest_3.png}} | | style="text-align: left;" | 3 {{sized-external-image|25px|https://foero.innogamescdn.com/assets/shared/icons/reward_icons/reward_icon_guild_battlegrounds_chest_3.png}} | ||
| style="text-align: right;" | 42 | | style="text-align: right;" | 42 | ||
| style="text-align: right;" | 35 | | style="text-align: right;" | 35 | ||
| style="text-align: right;" | | | style="text-align: right;" | 172.900 | ||
| style="text-align: right;" | 62 | | style="text-align: right;" | 62 | ||
| style="text-align: right;" | 52 | | style="text-align: right;" | 52 | ||
| style="text-align: right;" | | | style="text-align: right;" | 259.400 | ||
|- | |- | ||
| style="text-align: left;" | 4 {{sized-external-image|25px|https://foero.innogamescdn.com/assets/shared/icons/reward_icons/reward_icon_guild_battlegrounds_chest_4.png}} | | style="text-align: left;" | 4 {{sized-external-image|25px|https://foero.innogamescdn.com/assets/shared/icons/reward_icons/reward_icon_guild_battlegrounds_chest_4.png}} | ||
| style="text-align: right;" | 39 | | style="text-align: right;" | 39 | ||
| style="text-align: right;" | 31 | | style="text-align: right;" | 31 | ||
| style="text-align: right;" | | | style="text-align: right;" | 163.000 | ||
| style="text-align: right;" | 59 | | style="text-align: right;" | 59 | ||
| style="text-align: right;" | 46 | | style="text-align: right;" | 46 | ||
| style="text-align: right;" | | | style="text-align: right;" | 244.500 | ||
|- | |- | ||
| style="text-align: left;" | 5 {{sized-external-image|25px|https://foero.innogamescdn.com/assets/shared/icons/reward_icons/reward_icon_guild_battlegrounds_chest_5.png}} | | style="text-align: left;" | 5 {{sized-external-image|25px|https://foero.innogamescdn.com/assets/shared/icons/reward_icons/reward_icon_guild_battlegrounds_chest_5.png}} | ||
| style="text-align: right;" | 39 | | style="text-align: right;" | 39 | ||
| style="text-align: right;" | 29 | | style="text-align: right;" | 29 | ||
| style="text-align: right;" | | | style="text-align: right;" | 161.300 | ||
| style="text-align: right;" | 58 | | style="text-align: right;" | 58 | ||
| style="text-align: right;" | 43 | | style="text-align: right;" | 43 | ||
| style="text-align: right;" | | | style="text-align: right;" | 242.000 | ||
|- | |- | ||
| style="text-align: left;" | 6 {{sized-external-image|25px|https://foero.innogamescdn.com/assets/shared/icons/reward_icons/reward_icon_guild_battlegrounds_chest_6.png}} | | style="text-align: left;" | 6 {{sized-external-image|25px|https://foero.innogamescdn.com/assets/shared/icons/reward_icons/reward_icon_guild_battlegrounds_chest_6.png}} | ||
| style="text-align: right;" | 38 | | style="text-align: right;" | 38 | ||
| style="text-align: right;" | 27 | | style="text-align: right;" | 27 | ||
| style="text-align: right;" | | | style="text-align: right;" | 159.600 | ||
| style="text-align: right;" | 57 | | style="text-align: right;" | 57 | ||
| style="text-align: right;" | 40 | | style="text-align: right;" | 40 | ||
| style="text-align: right;" | | | style="text-align: right;" | 239.400 | ||
|- | |- | ||
| style="text-align: left;" | 7 {{sized-external-image|25px|https://foero.innogamescdn.com/assets/shared/icons/reward_icons/reward_icon_guild_battlegrounds_chest_7.png}} | | style="text-align: left;" | 7 {{sized-external-image|25px|https://foero.innogamescdn.com/assets/shared/icons/reward_icons/reward_icon_guild_battlegrounds_chest_7.png}} | ||
| style="text-align: right;" | 38 | | style="text-align: right;" | 38 | ||
| style="text-align: right;" | 24 | | style="text-align: right;" | 24 | ||
| style="text-align: right;" | | | style="text-align: right;" | 158.000 | ||
| style="text-align: right;" | 57 | | style="text-align: right;" | 57 | ||
| style="text-align: right;" | 37 | | style="text-align: right;" | 37 | ||
| style="text-align: right;" | | | style="text-align: right;" | 236.900 | ||
|- | |- | ||
| style="text-align: left;" | 8 {{sized-external-image|25px|https://foero.innogamescdn.com/assets/shared/icons/reward_icons/reward_icon_guild_battlegrounds_chest_8.png}} | | style="text-align: left;" | 8 {{sized-external-image|25px|https://foero.innogamescdn.com/assets/shared/icons/reward_icons/reward_icon_guild_battlegrounds_chest_8.png}} | ||
| style="text-align: right;" | 38 | | style="text-align: right;" | 38 | ||
| style="text-align: right;" | 23 | | style="text-align: right;" | 23 | ||
| style="text-align: right;" | | | style="text-align: right;" | 156.300 | ||
| style="text-align: right;" | 56 | | style="text-align: right;" | 56 | ||
| style="text-align: right;" | 34 | | style="text-align: right;" | 34 | ||
| style="text-align: right;" | | | style="text-align: right;" | 234.400 | ||
|} | |} | ||
Versiunea de la data 7 decembrie 2021 21:18
Istoric
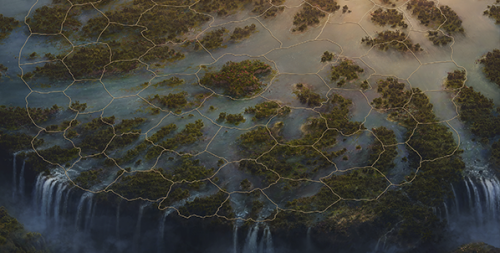
Arhipelagul cascadelor este a doua hartă din Câmpurile de luptă ale ghildelor. A intrat în joc în decembrie 2021 iar decorul este un arhipelag cu adevărat uimitor de insule mici deasupra unei mari cascade.
Dispunerea hărții

Dimensiunea hărții este practic aceeași ca și înainte, dar sectoarele au o formă hexagonală, care crește nivelul de dificultate, deoarece acum există până la șase căi de atac către ele.
Recompense
Puteți obține recompense imediate, temporare și permanente pe Câmpurile de luptă. După fiecare luptă sau negociere, există șansa de a obține Puncte de Forge, unități, bonusuri în atac, bunuri, Diamante și fragmente pentru Mărețul elefant. Calitatea acestor recompense depinde de liga în care vă aflați! Ghilda câștigă puncte temporare de prestigiu în funcție de actuala ligă, dar rețineți că le puteți și pierde atunci când scădeți în ligă. Nu în ultimul rând, avem și recompense permanente pentru voi și ghildă: ghildele vor primi putere în funcție de locul lor într-un câmp de luptă (cantitatea variază și în funcție de ligă) și puteți obține fragmente și pentru Pachetul de selecție Mărețul elefant.

Recompensele ghildei
 |
 |
 | ||||
|---|---|---|---|---|---|---|
| 1 |
13 | 54.600 | 26 | 109.200 | 39 | 163.800 |
| 2 |
12 | 47.900 | 23 | 95.700 | 35 | 143.500 |
| 3 |
11 | 43.300 | 21 | 86.500 | 31 | 129.700 |
| 4 |
10 | 40.800 | 20 | 81.500 | 30 | 122.300 |
| 5 |
10 | 40.400 | 20 | 80.700 | 29 | 121.000 |
| 6 |
10 | 39.900 | 19 | 79.800 | 29 | 119.700 |
| 7 |
10 | 39.500 | 19 | 79.000 | 29 | 118.500 |
| 8 |
10 | 39.100 | 19 | 78.200 | 28 | 117.200 |
 |
 | |||||
|---|---|---|---|---|---|---|
| 1 |
52 | 48 | 218.400 | 78 | 72 | 327.600 |
| 2 |
46 | 40 | 191.300 | 62 | 52 | 287.000 |
| 3 |
42 | 35 | 172.900 | 62 | 52 | 259.400 |
| 4 |
39 | 31 | 163.000 | 59 | 46 | 244.500 |
| 5 |
39 | 29 | 161.300 | 58 | 43 | 242.000 |
| 6 |
38 | 27 | 159.600 | 57 | 40 | 239.400 |
| 7 |
38 | 24 | 158.000 | 57 | 37 | 236.900 |
| 8 |
38 | 23 | 156.300 | 56 | 34 | 234.400 |
The Great Elephant
The Great Elephant is a 4x3 building, upgradeable up to 8 levels. As you upgrade it, you will receive different bonuses including: a coin production bonus, forge points, as well as goods to the Guild treasury and an increase in Guild Power! Lastly, and most importantly, there is also an attacking bonus for your attacking armies!
On its eighth and final level, you will met with a choice. A choice which reflects the variety of roles the elephant has held throughout the ages. Will you choose to employ your Great Elephant in battle, trade, or support? With these three brancheable choices; the decision is very much in your hands!
Note: 50% of the time, the immediate reward will be one fragment for the The Great Elephant Selection kit.
| The Great Elephant - Lv. 1 | The Great Elephant - Lv. 2 | The Great Elephant - Lv. 3 | The Great Elephant - Lv. 4 |
|---|---|---|---|
 |
 |
 |
 |
| The Great Elephant - Lv. 5 | The Great Elephant - Lv. 6 | The Great Elephant - Lv. 7 |
|---|---|---|
 |
 |
 |
| The Elephant's Bazaar | The Elephant's Citadel | The Elephant's Royalty |
|---|---|---|
 |
|
|
Iridescent Garden
Chain Building Addition - Iridescent Garden
Yet, that is not all you can win from a successful campaign! Indeed, diamonds and platinum league Guild participants can also win fragments of the Iridescent garden. With enough fragments, you can construct one of three possible appearances for the building, and bolster the stats of your Great Elephant!
| Iridescent Garden | ||
|---|---|---|

|

|

|
| Once connected it provides Happiness Bonus,Defensive boost for the attacker,3 Goods,1 Forge Point | ||
Important tips - As this is a chain building, it will need to be connected to the Great Elephant to receive certain bonuses.
Personal Rewards
Besides fragments to great elephant selection kits, you will find Diamonds, Forge Points, Goods, Units,coins, Supplies, attacker boost among the personal rewards in this battleground